Install Pulumi & Language Dependencies
These hands-on labs will walk you through various cloud infrastructure tasks. The prerequisites listed below are required to successfully complete them.
Pulumi
In order to run this workshop you will need to work with the Pulumi CLI.
You will use Pulumi to deploy infrastructure changes using code.
To install Pulumi run the following command:
curl -fsSL https://get.pulumi.com | sh
source ~/.bashrc
Now restart your Cloud 9 terminal
After installing the CLI, verify that it is working:
$ pulumi version
v2.8.0
If the Pulumi command isn’t recognized yet, You should close and relaunch the terminal window first.
You’ll also need to login to Pulumi to manage the storage of your infrastructure state. Run pulumi login:
$ pulumi login
Manage your Pulumi stacks by logging in.
Run `pulumi login --help` for alternative login options.
Enter your access token from https://app.pulumi.com/account/tokens
    or hit <ENTER> to log in using your browser                   :
Then click on the https://app.pulumi.com/account/tokens URL. If you have not yet signed up for a Pulumi account, login with your email, GitHub or other identity. After logging in, you will see the screen below.
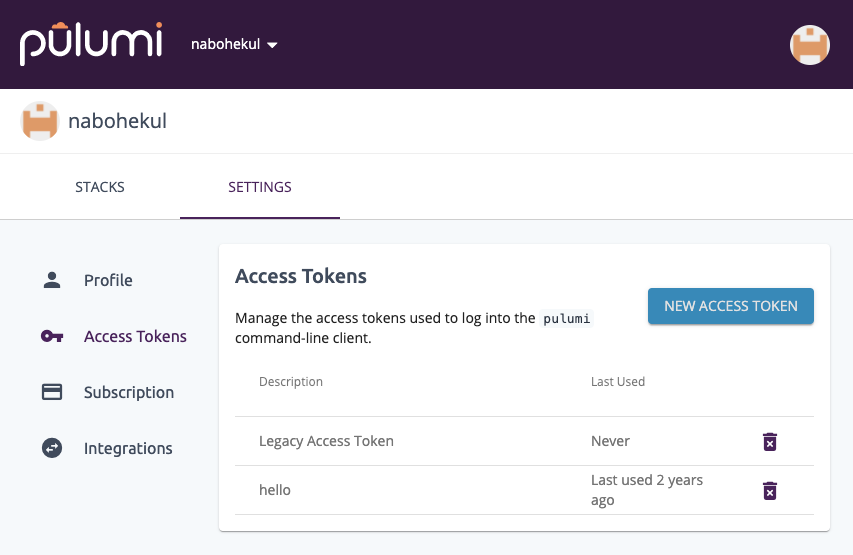
Click “NEW ACCESS TOKEN” and create a new accesss token. Copy that token and paste it into the prompt in your Cloud 9 terminal. If succesful, you will see this.
  Welcome to Pulumi!

  Pulumi helps you create, deploy, and manage infrastructure on any cloud using
  your favorite language. You can get started today with Pulumi at:

      https://www.pulumi.com/docs/get-started/

  Tip of the day: Resources you create with Pulumi are given unique names (a randomly
  generated suffix) by default. To learn more about auto-naming or customizing resource
  names see https://www.pulumi.com/docs/intro/concepts/programming-model/#autonaming.


Logged in to pulumi.com as nabohekul (https://app.pulumi.com/nabohekul)
Note: If you are unable to sign in to the Pulumi Service, you can still complete the workshop by using
pulumi login --local. However, some features highlighted in the workshop won’t be available if you use this option.
Node.js
If you are not running this workshop from Cloud9 you will need to install Node.js.
You will need Node.js version 10 or later to run Pulumi programs written in TypeScript. Install your desired LTS version from the Node.js download page or using a package manager.
After installing, verify that Node.js is working:
$ node --version
v12.10.0
Also verify that the Node Package Manager (NPM) is working:
$ npm --version
6.10.3
Docker
If you are not running this workshop from Cloud9 you will need to install Docker.
If you will be completing the container labs, install Docker Community Edition. After doing so, verify that the docker CLI is operational:
$ docker --version
Docker version 19.03.1, build 74b1e89
Kubectl
If you will be completing the Kubernetes labs, install the kubectl CLI. It isn’t necessary to configure it to speak to a cluster — you will do that during the appropriate labs that require it.
Download the latest release:
curl -LO "https://storage.googleapis.com/kubernetes-release/release/$(curl -s https://storage.googleapis.com/kubernetes-release/release/stable.txt)/bin/linux/amd64/kubectl"
Make the kubetcl binary executable:
chmod +x ./kubectl
Move the binary into your path:
sudo mv ./kubectl /usr/local/bin/kubectl
Test to ensure the version you installed is up to date:
kubectl version --client
AWS Subscription and CLI
At various points, you will use the AWS CLI to interact with infrastructure you’ve provisioned. Installation instructions are available here, or are available for Linux below. As explained further on that page, the CLI requires Python.
curl "https://awscli.amazonaws.com/awscli-exe-linux-x86_64.zip" -o "awscliv2.zip"
unzip awscliv2.zip
sudo ./aws/install
If you have multiple AWS accounts, you’ll need to configure a profile for the account you’re using in these labs. That process is described here. All Pulumi operations will respect your profile settings.
To verify that everything is working, run:
aws sts get-caller-identity
{
    "UserId": "ABDAII73ZGOGZ5V4QSTWY",
    "Account": "161298451113",
    "Arn": "arn:aws:iam::161298451113:user/joe@pulumi.com"
}